Images for Web
Images on the web take up significantly more space and bandwidth than almost any other kind of content. They're the single biggest contributor to how fast or slow your web pages load.
Preparing images for use on the web is mainly about reducing their file size as much as possible, with a minimal compromise in their appearance. This means choosing not only the right file format for the type of image, but also the specific settings used when saving it.
Before we dive into the details of how image formats work, here's the tl;dr bottom line:
Is the image a photo?
Save it as a jpg, about/at least 2x the size it will be displayed at.
Is the image a vector?
Save it as svg or png
Raster vs Vector
Image formats fall into one of two categories: raster or vector.
Raster images are stored as a grid of individual pixels. Every pixel has a color value that is independent of the pixels around it. High resolution images have millions of pixels. This is great for images that have a lot of detail and texture, but it's a pretty wasteful way to store graphics that are mostly basic shapes and large areas of the same color.

It's important to understand that while we as humans can recognize the shapes and colors to make sense of a raster image, computers (most of the time) cannot. Without image recognition software, raster images are basically a black box to a computer. They don't know the difference between a basketball, an orange, and someone's face.
Most of the time this is fine, but Photoshop can't easily enhance someone's eyes without being told where they are. And even then it doesn't know that they're "eyes"... just some lighter pixels next to some darker pixels.
Vector images on the other hand are made up of mathematical data - something computers can deal with a lot more easily. Instead of a grid of pixels, vector formats use coordinates and equations to construct shapes.
"Start at coordinates 20,50. Draw a line to 30,70. Curve from there to 15,40. Close the shape at 20,50. Fill it with black."
This kind of data structure is not so great for photos, but it's excellent for shapes, logos and illustrations.
Image File Formats
| Format | Full Name | Compression | Best Use |
| CR2, ARW, NEF, DNG, etc. | Canon Raw 2 / Sony Alpha Raw / Nikon Electronic Format / Digital Negative Graphics | Lossless | archival photographs |
| TIF/TIFF | Tagged Image File Format | None | archival photographs and scans, high quality printing |
| JPG/JPEG | Joint Photographic Experts Group | Lossy | web-ready/finished photographs, standard printing |
| GIF | Graphics Interchange Format | Lossless | memes. |
| PNG | Portable Network Graphics | Lossless | non-photographic images - illustrations, logos, vectors |
| SVG | Scalable Vector Graphics | None/Lossless | non-photographic images - illustrations, logos, vectors |
Cr2, arw, nef, dng, etc. are proprietary file formats (except non-proprietary dng) containing the raw data exactly as captured by a digital camera's sensor. They require further processing for portable viewing and printing, but are the best format for archiving and long term storage.
Tiff dates back to 1986 with the first scanners which could only store 0s or 1s (black or white), later greyscale, and now deep colors. This format is usually uncompressed, resulting in very large files.
Psd is basically a special kind of container file. Every layer in a psd file is either a tiff or vector data. Psds should never be used on web sites.
Jpeg uses a variable lossy compression algorithm for crunching the data, making file sizes very small. Introduced in 1992 it is now the most widely distributed image format.
Gif was originally created for small graphics on the web, and can handle animation and transparency. It is limited to a 256 color palette. The format is widely supported, but really only exists anymore because of its built-in animation capability.
In order to fake the appearance of having more colors, gifs and other limited-palette formats use a technique called dithering.
Png is a replacement for gif, has better color handling, better transparency support, and better compression (typically 5-25% better than gif). It is not intended to replace jpeg however, and is better for vector-based images than photographs. Photographs saved to png are still roughly 5 times larger than an equivalent jpeg.
Svg is one of the newest formats supported by browsers for vector based graphics. It uses text-based xml, which is similar to html. Instead of containing pixel data, svg is a structured set of "instructions" for recreating the image in its original vector form. Using plain text instead of raster data makes the file size very small.
Small files aren't the only thing that makes svg really exciting. Because it's a text-based format, browsers can understand its elements just like html, applying css styling and even interactive animation!
There are multiple ways to insert svg files into your pages, but the easiest is to just source them in an <img> tag like any other picture.
Adobe Illustrator can export svg files.
To summarize, on the web you should always use jpeg for photographs, and either svg or png for vectors.
Load Times Compared
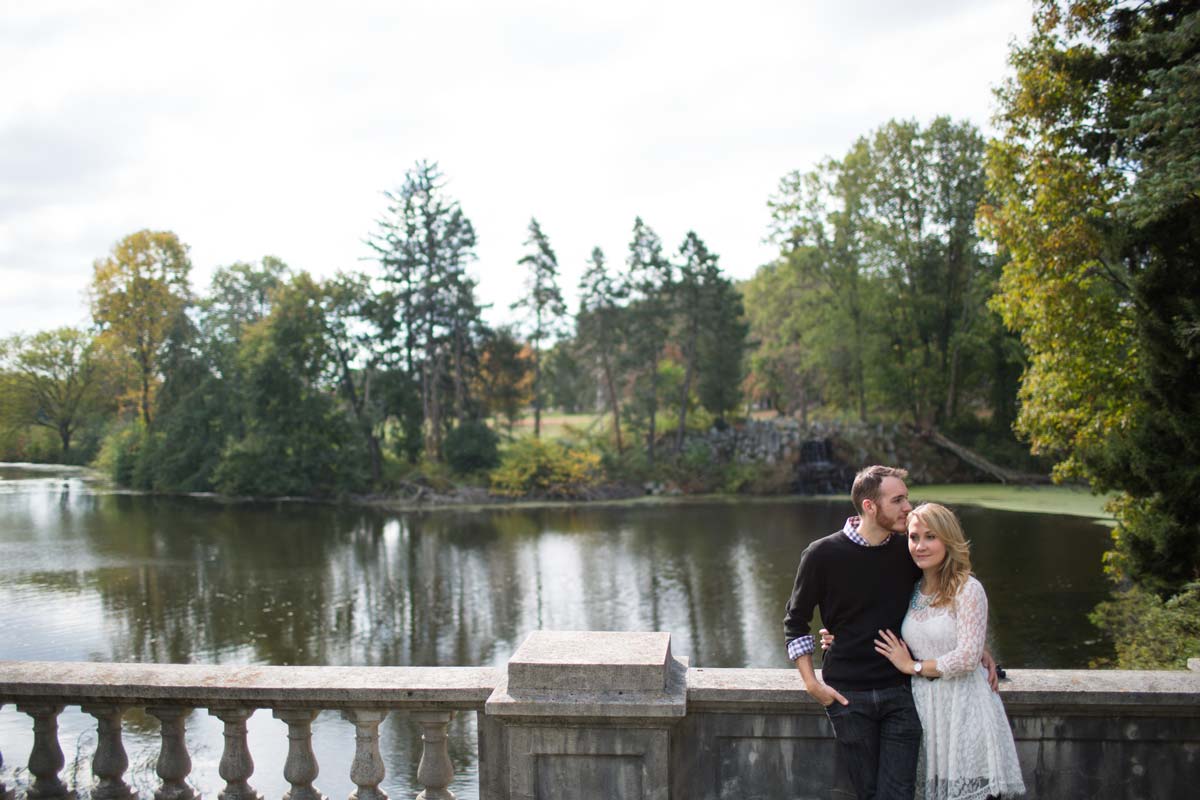
Let's take a sample photograph and compare about how long it would take to load in different formats. We'll compare a web ready jpeg, a high-resolution jpeg, and tiff.
Although their sizes are drastically different, there's virtually no difference in the way these images appear on the page:
File size: 115KB

File size: 3.5MB (approx. 30x bigger).
File size: 123.84MB (approx. 35x bigger than high-quality jpeg, 1080x bigger than web-ready).
| Connection Type | Speed | Web jpeg | Large jpeg | Uncompressed tiff |
| Broadband nat'l avg | 64.17mbps | 0.01sec | 0.44sec | 15.44sec |
| Wireless nat'l avg | 27.33mbps | 0.03sec | 1.02sec | 36.25sec |
| 3G average | 1.5mbps | 0.61sec | 18.65sec | 660.47sec (11min) |
| DSL | 2mbps | 0.46sec | 13.98sec | 495.36sec (8.3min) |
Lossy Compression and Artifacts
File compression can either be lossless or lossy.
Lossless file compression means that some of the data is removed from the file when it is saved, but in a way that the original data can be fully restored.
Pretend the code below represents the RGB values from a few neighboring pixels in a large image:
[0,0,0] [0,0,0] [0,0,0] [0,2,0] [0,0,0]
Using lossless compression, the pixels are stored roughly like this:
3x[0,0,0] [0,2,0] [0,0,0]
The information is expressed in a shorter way, but when the file is reopened it gets turned back into its original form. None of the information is permanently lost, meaning that lossless compression is even better than no compression.
Lossy compression on the other hand does throw some of the original information away, so the full integrity of the original data is permanently lost. Pixels that are near each other are analyzed for similarity. If the values are similar, lossy compression says "good enough!" and crunches them together like so:
5x[0,0,0]
Jpeg compression has a few different algorithms for different situations, and they're all really smart. You'll also have finite control of how heavy-handed the compression is. If done right, the image will look almost exactly the same.
That said, every time you re-save a file in a lossy format, it goes through the same process of throwing some information away. For this reason you should never use lossy file formats while editing. You should also be aware of this inherent loss of quality when using files like jpeg as your main archiving format.
Once the data's gone you can't get it back. The best practice in general is to work on files in lossless formats and only save to a lossy format as the final step. You should always retain the higher quality files too.
MP3 files use a remarkably smiliar technique to reduce the size of digital music.
Artifacts
Because the data is being simplified, lossy compression often results in artifacts. Most of the time the effect is not very obvious, but heavy compression or multiple passes of compression on a file will make it visible.
This is why lossless files are preferred for high quality printing. Artifacts are particularly obvious in photos with textile patterns, textures, and large subtle gradient regions like skies.
The same goes for mp3s. A heavily compressed mp3 will have audibly muddy bass and harsh highs, which is where the compression is usually most heavy handed.
Here's that web ready image from above one more time:
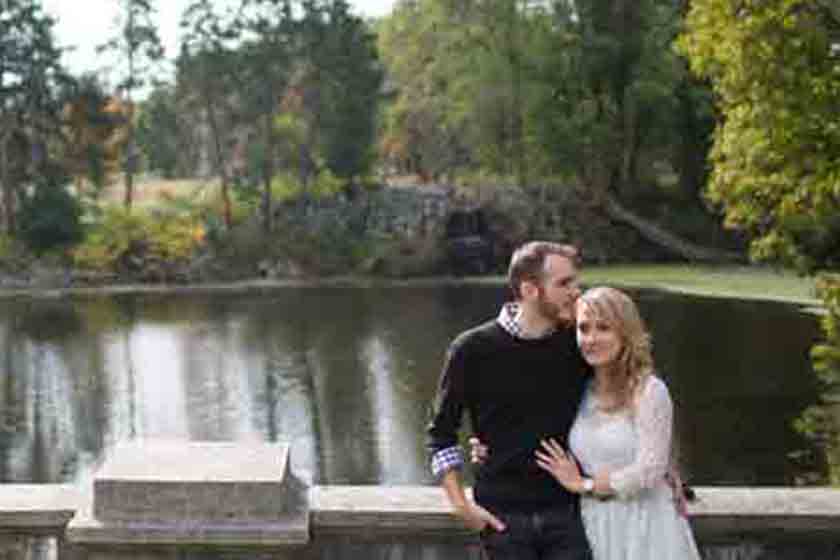
And here is that image saved again at minimum quality (0 out of 100). To show the artifacts a little closer, I cropped the file and saved it one more time.
Prepping Images Using Photoshop
The following is a tutorial on creating an action in Photoshop while prepping an image for the web. An action is an excellent way to automate several steps, but it's not necessary to record and create an action for just a few images. You can always perform the steps below manually.
Adobe Lightroom and programs like it are designed for editing and handling images in large volumes. If you have the option, Lightroom is great for working with a large volume of images.
Here are the general steps we're going to take:
- Open raw file and make adjustments in ACR (Adobe Camera Raw)
- Resize/resample the image to an appropriate size for the destination
- Sharpen if necessary
- Save the image to a new file at an appropriate compression level
The ideal file size for web-ready images depends on the image's target display size, but should almost always be under 1MB.
If you have 5-10 (or more) high resolution images to work with, you can follow along.
First you'll need some folders. Drop your files in the appropriate folder:
images/
├── raw/
├── jpeg-high-quality/
└── jpeg-web-ready/
If you're starting with high-quality jpegs you can ignore the raw folder and the next step.
Covert RAW to Jpeg
If you have raw files, convert them to a high-quality jpeg using the following settings:
- Adjust exposure, white balance, etc. as needed.
- Leave them original size.
- Assign them to sRGB color space.
- If you're using Lightroom save them at quality 85.
- If you're using ACR (Adobe Camera Raw) and saving out of Photoshop, Level 10. In my personal testing they are roughly equivalent.
While it may seem strange, many professional labs and printing companies accept nothing more than sRGB, Level 10 jpegs for printing. Also, there is no perceivable difference between Photoshop's level 10 and level 12 (the highest). It's only wasting space.
Open the Image for Processing
Ok, now you've got some high quality jpegs that need to be saved down for the web.
For this demo we are saving a jpeg to a jpeg which runs the file through compression twice. Generally this is a bad practice, but if the original quality is high enough it won't be noticeable.
Open one of the high quality jpegs in Photoshop.
We're going to create and record a Photoshop action using one file, then replay the action on all of them.
Before we go any further, duplicate the image (Image > Duplicate...), change the name to note something about being web ready, and close the original in case we make any mistakes.
Open the actions palette (OPT+F9) and create a new action.
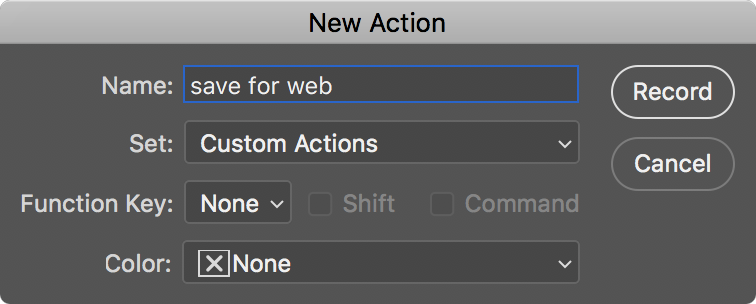
Name it something like "save for web" and hit OK. You'll now see an active "recording" icon. Photoshop is now recording all of the edits we make on our image.
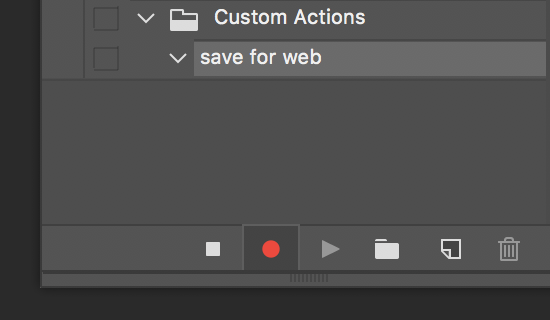
If you make a mistake, you can always hit the stop button to stop recording temporarily. Each step you've recorded under the action can be deleted or rearranged individually.
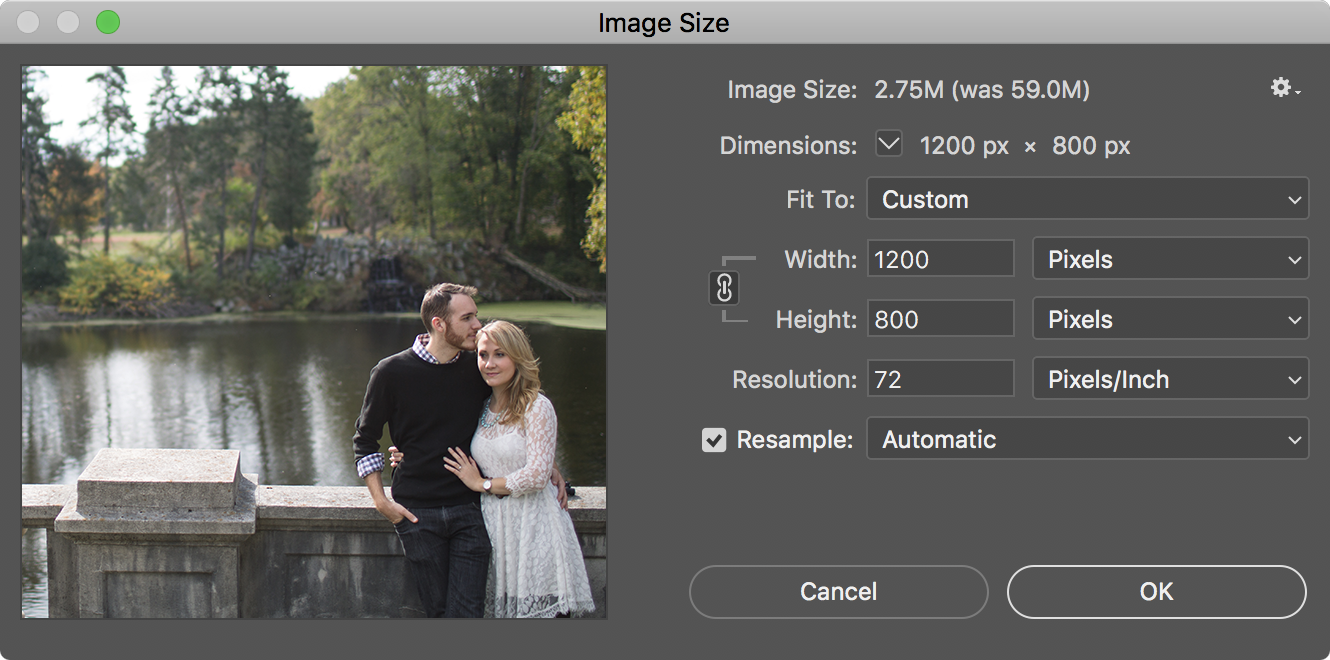
Resize the image under Image > Image Size... (CMD+OPT+I).
- Use 72dpi.
- Choose a resampling method. "Automatic" is usually fine.
- Choose a size that is no smaller than your intended display size. About 2x the intended display size is good for retina displays. Most importantly, you should never have to scale an image back up when displaying in the browser.
Sharpen the image if needed.
- The Automatic image resizing method usually applies enough sharpening.
- If the image needs more, duplicate the background layer (
CMD+J) and use Filter > Sharpen > Unsharp Mask.
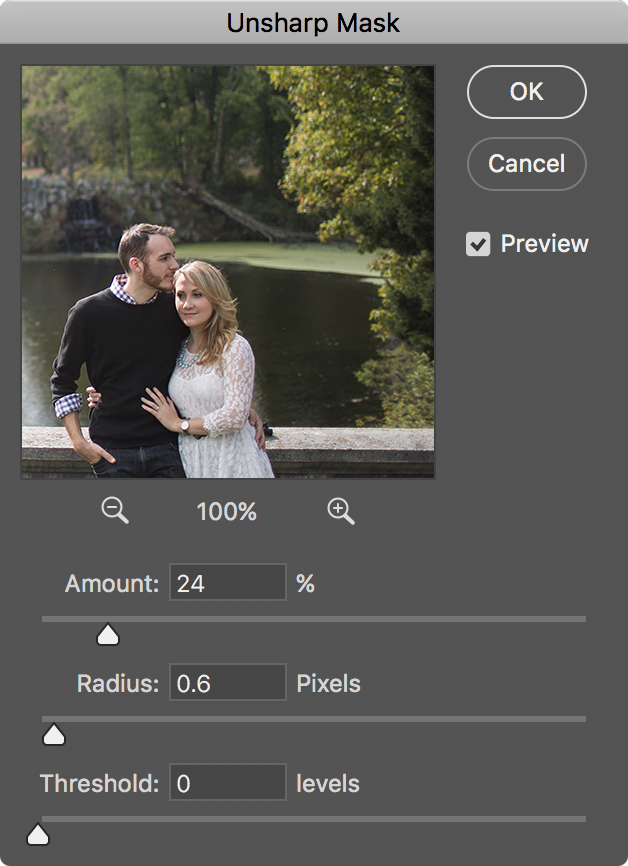
- Settings here depend on the image. Play with the Amount and Radius settings. The radius is usually pretty small.
- Since you're sharpening on a new layer, you can toggle the layer's visibility and turn down its opacity to reduce the effect. Be careful not to over sharpen.
Save for Web
Now we're ready to save. Get your save for web claw ready. To save the image out, go to File > Export > Save for Web (Legacy)... (CMD+OPT+SHIFT+S).
Save for Web is different than regular Save As... > jpeg. It offers more control, uses different algorithms, and strips extraneous metadata from the images.
You might be surprised how much metadata is often attached to photos.
Photoshop's Save for Web function is extremely good at producing the smallest possible jpeg file size. It reduces the file as much as possible with the least compromise in image quality.
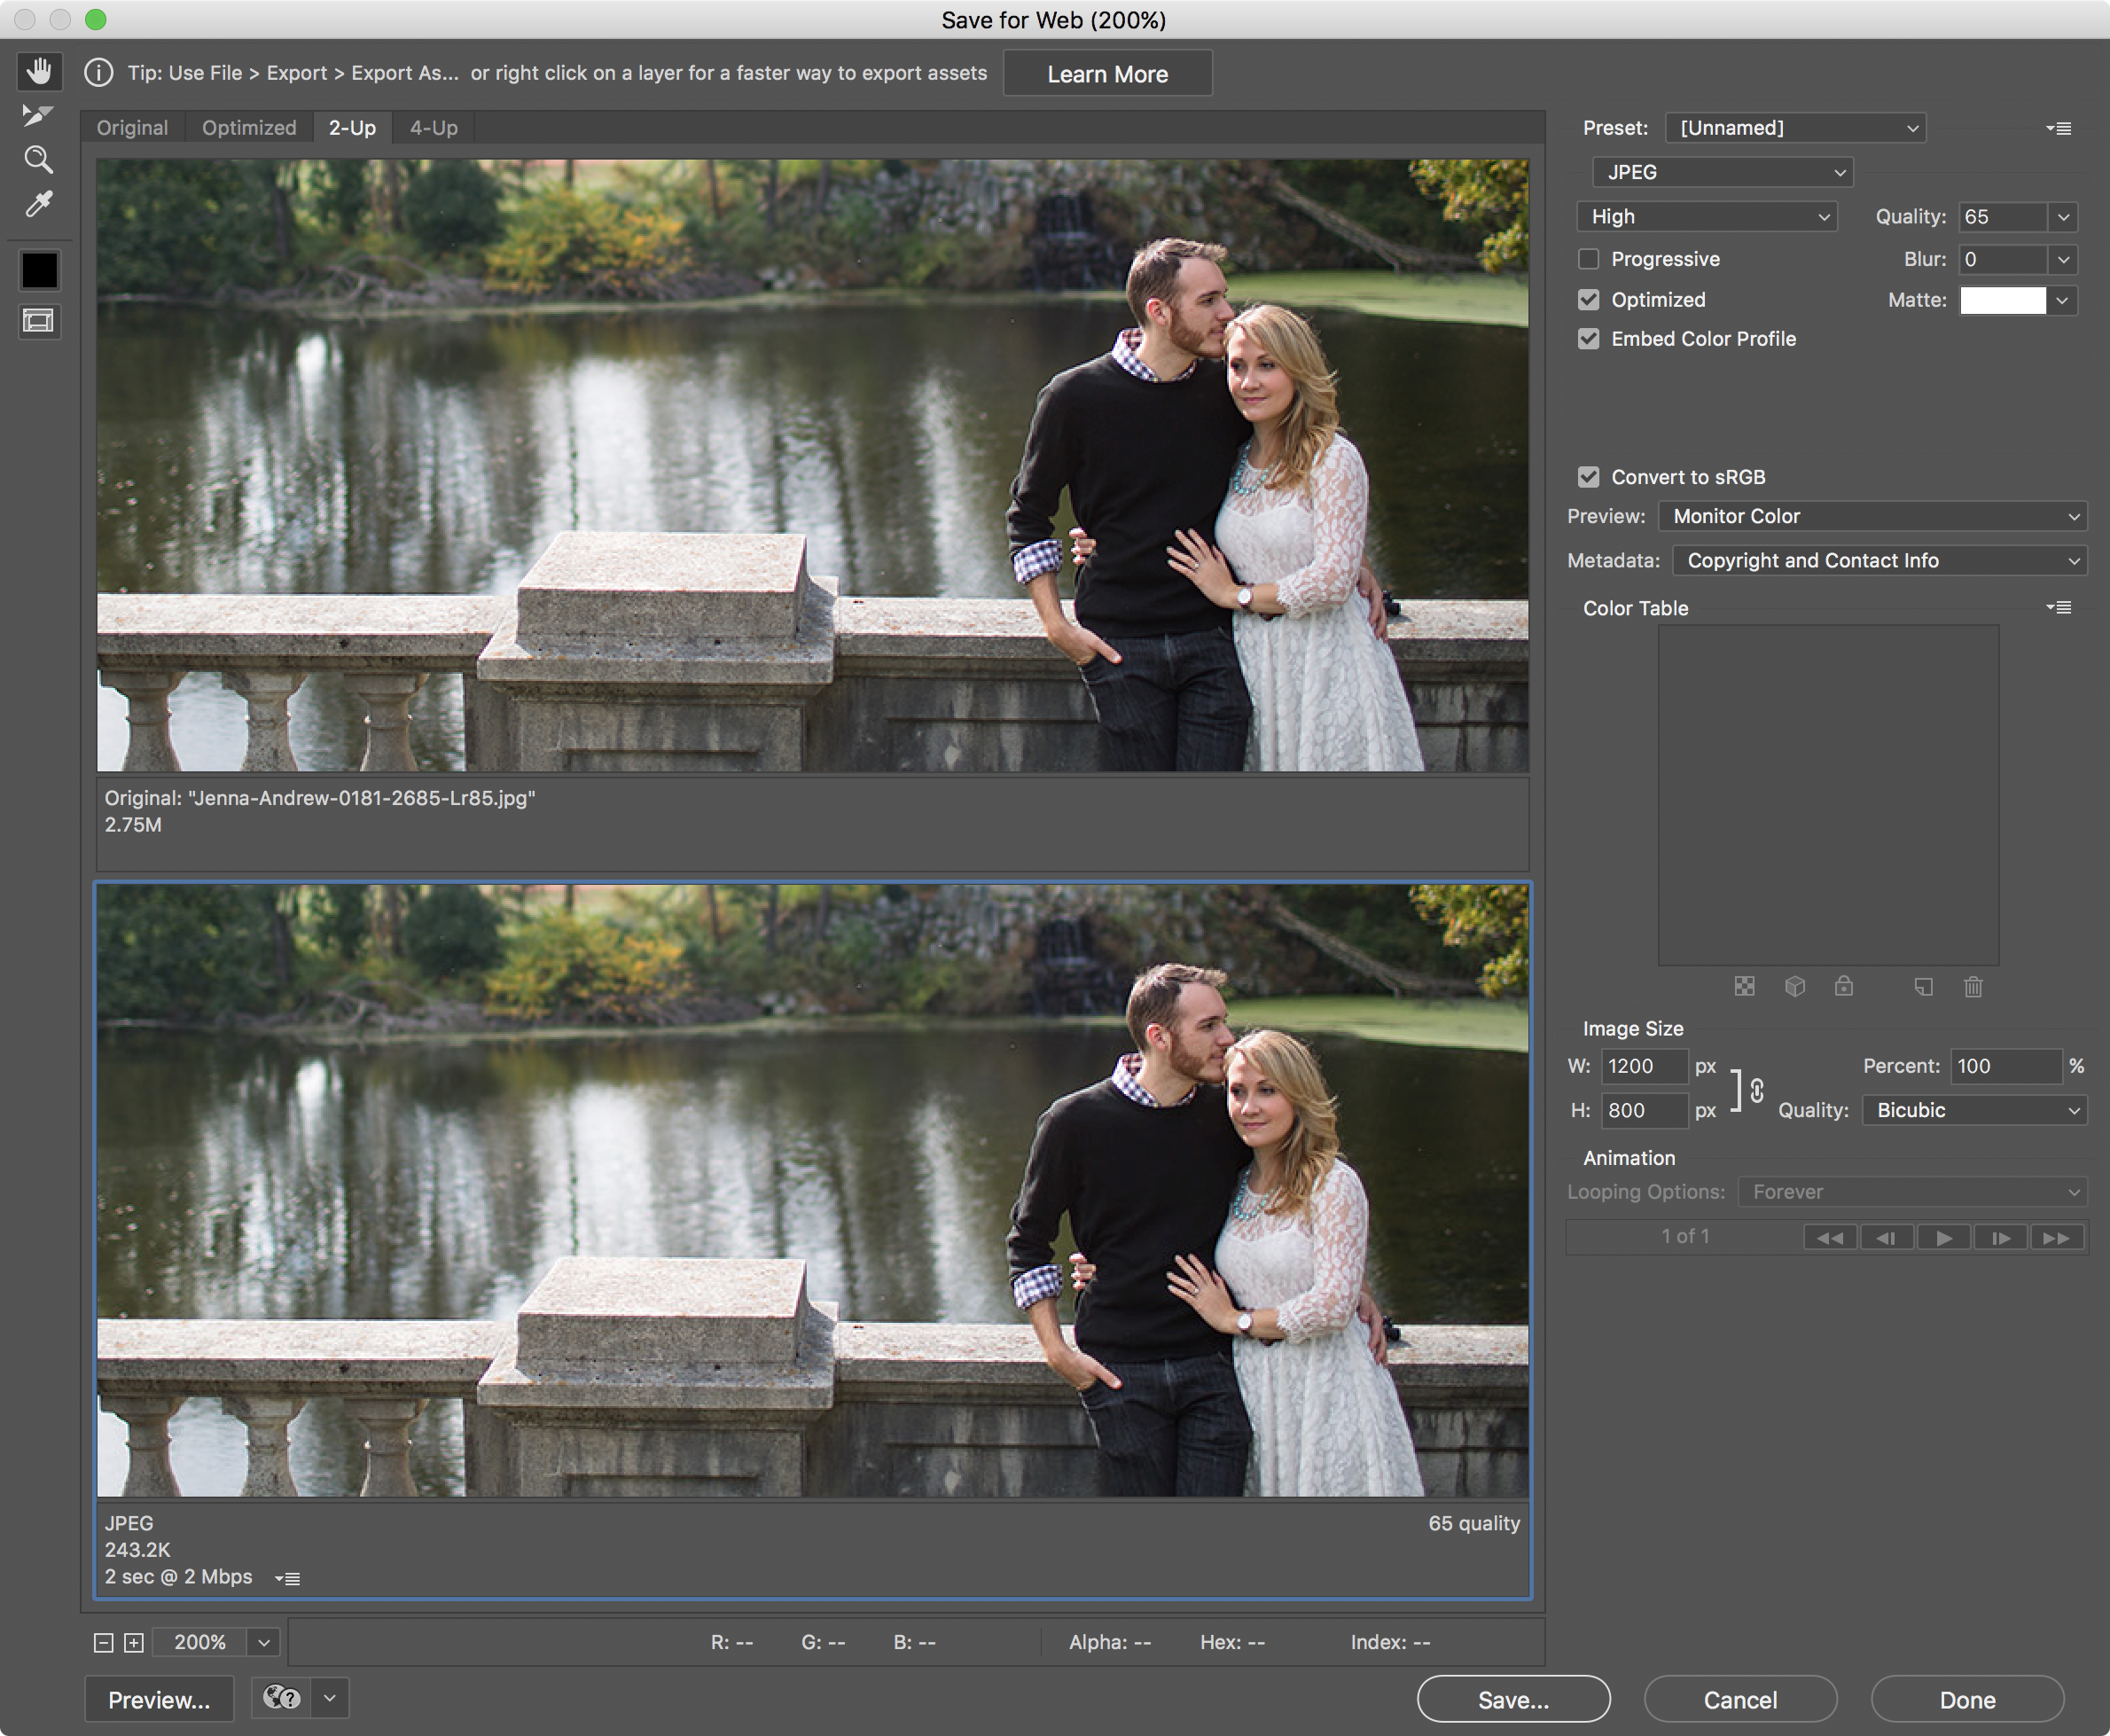
- Select jpeg for the file type.
- Set the quality as low as possible without any visible artifacts. This will depend on both the image size and its content. You can preview what it looks like to the left, and compare it to the original in the "2-Up" tab.
- The more oversized your image is, the more you should be able to compress it.
- Select "Optimized" and "Embed Color Profile"
- Make sure "Convert to sRGB" is selected.
- Optionally, choose what metadata you want to preserve.
- I prefer to keep my resizing step separate in the recorded action, but you can also perform resizing here.
- When you're ready, hit Save. "Done" will simply save your settings and dismiss the window without saving an actual file.
Save to the jpeg-web-ready/ folder. Do not change the name of the file here. If you change the name, that name gets added to the action we're creating, and every image we play this action on will be given the same name.
Close the image that's open without saving. We've already saved the web ready version.
Stop the action. You'll see a summary of all the steps. You can expand each one by clicking the triangle next to it to see all of the settings that were recorded.
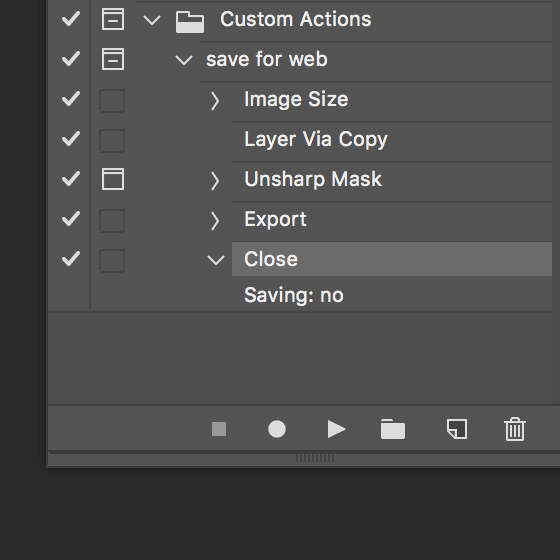
All of the steps we just took can now be repeated simply by selecting the action and hitting the play button.
Go ahead and test it if you want. Open another high quality image and play the action.
You can toggle steps on and off by clicking the check marks next to them in the actions palette. The action simply skips any step that's unchecked.
You can also have the action pause at any dialog to let you tweak the settings, by clicking the box icon next to the check mark. The action will stop at that step, show you the dialog to change the settings, and resume when you're done. In the image above I turned this on for my Unsharp Mask step.
Automate
Here's the cool part. Photoshop can run a selected action on an entire folder of photos.
Delete any files you've already created in the jpeg-web-ready/ folder.
Now go to File > Automate > Batch...
While working in Adobe Bridge, you can also access this dialog under Tools > Photoshop > Batch...
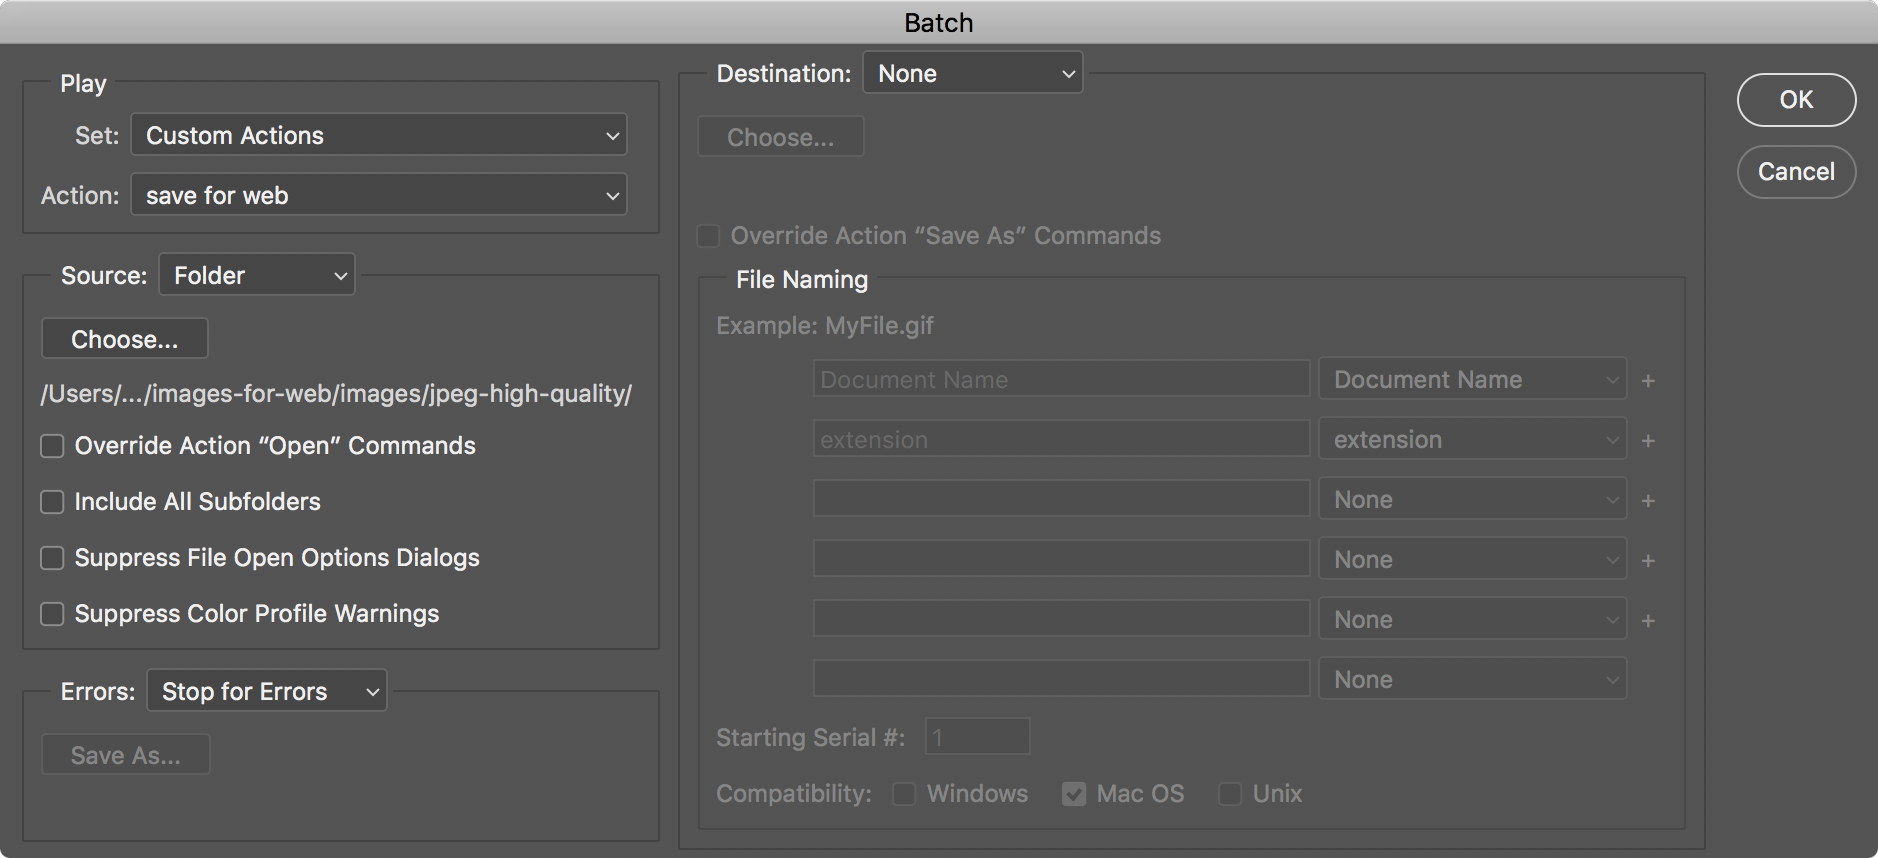
- Select the action and choose the source folder.
- We already have a save and close step as part of our action, but the batch dialog can handle that step for us as well. We can also rename the files as they're being saved.
- When you're ready, hit OK and watch Photoshop go to work. If the image files are very large or there are a lot of them, it may take a few minutes.
That's it! Again, Adobe Lightroom and programs like it make batch editing easier than a photoshop action. But this method is the next best thing in the absence of a batch editor, and it uses an excellent jpeg rendering engine.